This spring/summer I plan to buy the kids a few basics (tee's, leggings, sweaters...) and sew skirts, dresses and hats to go with them. It's a plan not an oath, so I will see how we go! Since it is well and truly spring, time to get sewing. Alannah has a new party dress, so it was Xanthe's turn for a new piece of clothing. As we seem to have lots of Tee shirts from Alannah in Xanthe's size I decided to sew her a skirt..........even though I knew she would prefer a dress!
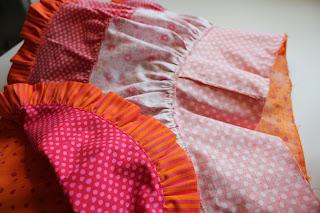
A couple of summers ago I sewed Alannah a simple 3 tiered skirt with a extra frill hem. She loves it and still wears it but I felt it could be fuller, and that perhaps I should have lined it. After more thought, instead of lining it I thought it might be more useful and fun to make it reversible, which would give it the volume and extra girly twirlyness plus 2 skirts in one. So this is Xanthe's new Twirly Whirly Reversible Tierd Skirt:
A couple of summers ago I sewed Alannah a simple 3 tiered skirt with a extra frill hem. She loves it and still wears it but I felt it could be fuller, and that perhaps I should have lined it. After more thought, instead of lining it I thought it might be more useful and fun to make it reversible, which would give it the volume and extra girly twirlyness plus 2 skirts in one. So this is Xanthe's new Twirly Whirly Reversible Tierd Skirt:
Twirly Whirly Reversible Tiered Skirt Tutorial
This is a very straight forward skirt to make, but all those long gathered seams are time consuming! Essentially you will be making two identical (in pattern) skirts and sewing them together so I highly recommend making them both at the same time. If it gets too confusing, finish one and then repeat the instructions for the second.
I chose to make one side in multi fabric and the reverse side in one fabric but with ribbon trim on the seams. There are so many ways you can vary this skirt by mixing up the fabrics and trims. I would like to make a variation with cotton lace as one hemband, perhaps a little longer than the other to give a petticoat feel one way and a country feel the other.
You will need
- Approx 1 yard of fabric for each skirt (that is what I used for this skirt, approx 4T size, you will need more or less if you make a larger or smaller size!)
- Coordinating thread
- 1" wide elastic (length = waist measurement of your child less 1 ")
- Optional ribbon or trims
Cutting Your Strips
The beauty of this skirt is that nothing needs to be exact. These are roughly the formulas I used to cut my strips for the skirt:
The beauty of this skirt is that nothing needs to be exact. These are roughly the formulas I used to cut my strips for the skirt:
- For the width of the strips, you want to make sure each band is progressively larger than the previous to have plenty of gather each tier. I have kept the waistband relatively narrow so there is not too much bulk from the double layer of fabric.
- For the length, the skirt is essentially 3 even bands with an extra frill. So determine the finished length you require and divide by 3. I have used a 1/4" seam allowance to sew this skirt so add 1/2" to each of the first three bands for the seam allowance. The hemband is 3" including seam allowance.
 My daughters waist measurement was 20" and a skirt length of 13" was required. So I cut the waistband at 27" x 4 1/2". For the first tier I cut two strips of 27" x 4 1/2". For the second tier I cut 2 strips at 42" x 4 1/2". For the hemband I cut 3 strips at 42" x 3".
Note: She is a small almost 4 year old so I cut this large for her to grow into, I would estimate that my measurements equate to around a 4T (with a smaller than average waist).
I also wanted to use ribbon for trimming one side of the skirt. I needed the length of my hemband + length of 1st tier in ribbon (27" x 3 = 81").
Don't forget to cut out strips for both skirts.
Sewing The Skirt
Note: a 1/4" seam allowance is used for all seams.
Note: a 1/4" seam allowance is used for all seams.
1. With fabric right sides together sew the short ends of the waistband together. With right sides together match the short sides of the remaining 3 layers sewing each tier into a band. Finish the short edge seams as desired, I used a zig zag stitch. Press the seams on the tiers to one side.
For the hem band it is not necessary to finish the seams (yes I know I
did but I wasn't thinking!). Instead fold in half around the long edge
with right sides out and press.
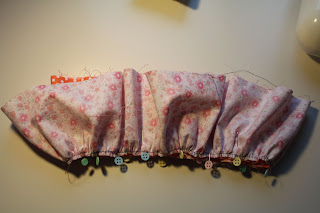
2. You will now have 8 bands (4 if you are sewing one skirt at a time). Using a long basting stitch baste the the top of the first tier and second tier and the folded raw edge of the hem band, just inside the 1/4" you will use to finish the seam (the waistband gathers with the elastic). Do not reverse your stitching at the start and finish or cross over your stitching, but run a couple of inches parallel at the start finish point as in the picture.
Tip: For basting I adjust my machine to maximum stitch length and change the thread to a contrasting colour to make it easier to unpick once the seam is sewn (black in this case).
3. Gather the first tier to fit the bottom of the waistband piece. This is done by gently pulling the bobbin thread and easing the gather evenly around the band.
Note: Gathering is definitely fiddly at first. There are other methods you can try this is just the one I use.
4. With right sides together pin and sew together, the bottom of the waistband with the top of the first tier.
Note: Don't forget to change the thread back to your sewing colour and stitch length back to normal.
Note: Don't forget to change the thread back to your sewing colour and stitch length back to normal.
5. Unpick the basting stitches and neaten up the stray threads. Make sure to check the right side.
6. Finish off the raw edges. Iron the seam towards the waistband and top stitch 1/8" from the seam.
Tip: The top stitch is to keep the seams neat, but it can be a feature, use a contrasting thread or fancy stitch to add interest. Sew ric rac or ribbon around the seam to add a bolder statement. If you won't catch the seam with the trim then top stitch the seam first to keep the seams tidy (on the inside). Also I use a slightly longer stitch for top stitching, I think it gives a neater finish.
7. Repeat steps 3 to 6 to attach the second tier to the first tier and the hem ruffle to the second tier.
Tip: To attach the second layer to the third, a good place to start is to match up the seams and gather in two halves rather than the whole skirt at once.
8. You should now have two almost finished skirts. With one skirt inside the other, right sides together and the waistband raw edges matching sew together with a 1/4" seam.
9. Turn right sides out (wrong sides together) and roll the top edge with your fingers then press.
10. Top stitch 1/8" from the edge.
Tip: You can you a different coloured thread in your bobbin to your machine thread so each side is top stitched in matching threads. I used a cream thread for the top stitching on my multi fabric side and a pink thread in my bobbin for my all orange side.
Tip: You can you a different coloured thread in your bobbin to your machine thread so each side is top stitched in matching threads. I used a cream thread for the top stitching on my multi fabric side and a pink thread in my bobbin for my all orange side.
11. Sew another row of stitching 1 1/4" from the edge to form a casing for the elastic. Leave 2 inch gap to feed the elastic. To get the right fit I measure my child's waist remove one inch from the measurement and sew the elastic ends together (many times) with a zig zag stitch using a 1/2" overlap.
12. Sew closed the gap you left for feeding the elastic and you have one twirly whirly reversible tiered skirt.
If you use this tutorial or are even just inspired by this tutorial to make a skirt I would love to see it. Please post photos or links on my facebook page or send me an email.
Margaret x
Margaret x


I am making this today...can't wait to see my granddaughter's face when she sees it! I have a question....Are the two sides of the skirt attached in any way to each other at the bottom, or are they just loose of each other??
ReplyDeleteThanks for the tutorial, it was helpful.
ReplyDelete