Thursday, April 26, 2012

KCWC day 1 to 3 progress.

So it took day 1 and 2 but my first item is finished!  Alannah has Pajama day at school on Friday so a new pair of Pj's were in order.  I used an old pair of Pajama's for the rough pattern.  It would have been easier with an actual pattern but I was quite surprised at how well I managed without.  There was lots of procrastination before cutting, I was sooo nervous that I was going to completely muck it up!!  So I made them quite big, then sized them down a bit and finally decided to leave them a little too big, as room to grow is always a good thing.  The trim is made from a scrap I received in a recent scrap pack (from Hawthorne Threads, which I see have sold out) and is Michael Miller's Ta Dot in fuschia . I couldn't believe how well it matched.  If I had more I would have folded the cuff  in half stitched it to the bottom of the pants and then top stitched the seam.  I didn't, so I sewed on the contrast fabric and hemmed it which looks a bit odd to me, but I am sure no one else will notice.  The main pant fabric is Ann Kelle's from her Desert Party range, the Sorbet print on a white background.  The Tee shirt is a cheapie from H&M which I appliqued the simple ice block shape on to make the set. 


On Wednesday, or Day 3 as it is known this week, I started my mans business shirt to a dress project.  I first got the idea from Dana's blog.   Just to be difficult (to myself) I decided I didn't want to follow the tutorial, but instead it has become more of an inspiration.  Much time wasting went into this, I seem to get a lot more completed when I have a definite pattern, but I have now a clear idea/sketch of what I want to sew and a shirt in bits.  Today (day 4) I will start sewing it and hopefully I will have another item of clothing complete by the end of the week.

Sunday, April 22, 2012

Happy Earth Day - Out in the Garden

So I had some sewing projects in mind to mark this day and I really wanted to participate in the Feather your Nest sew along.  But the weather was against my lamp refurbishment, as I am not about to use spray glue inside my house!  The picnic quilt that I hoped to make last spring, well I have now made great progress but really that is for the garden not the house. The awesome patchwork throw that I have been saving our old woollens for, I still don't have enough patches.  Finally the girls dress refashioned from a mans shirt has been moved to number 2 item on my sewing list for this weeks KCWC.

So no lovely repurposed or recycled sewing finishes but we did finally get enough clear weather to finish digging out the vegetable patch, sow some seeds and plant our seedlings. Our friends the Hippersons came and helped, as they are missing having a garden of their own to dig in.  This is our first vegetable garden in this part of the world so it will be a learning experience as to what grows well in this climate.  Plus battle has already begun on the the thousands of slugs that already call our garden home!  We had never seen slugs in such numbers till we moved here.

James and Alannah pleased with their efforts in the vegetable patch.
We love growing our own produce.  We both grew up with vegetable patches and planted our first vegie patch together in 2003.  Our current garden not only has the largest plot we have ever had for vegetables but the rest of the garden is full of established fruit trees and berry bushes.  We don't aim to be self sufficient, just to supplement what we get from the supermarket but we do tailor our cooking around the produce we have on hand. We find herbs and salad greens are the most handy to have in the garden, it is nice to pick a few fresh leaves to make a quick side salad for dinner. 
Xanthe helped me sowing seeds in the egg boxes we had left over from Easter.  We don't have any seedling trays and are hoping that these will make good substitutes.  She then proceeded to sing to them, tell them a story and give them a light water, too cute!  These could be the most cared for little seeds, soon to be seedlings on the planet.


Here are all the seeds in their trays, I used  a permanent marker to write what they are on the side of the box, I am hoping it stays legible or there could be some lucky guessing when we plant them out in a few weeks......


So there you have it that is our little bit for environment, well actually for us, for a couple of days work across the year it is so rewarding!

Happy Earth Day xx

Wednesday, April 18, 2012

Fabric Headband Tutorial

My little girls are into all things girly, twirly skirts and dresses, pink, flowers, accessorising with bracelets, necklaces and headbands.....  Anyone that knows me would wonder where these girls come from.  It has taken awhile but I have embraced their girlyness in all its splendor.  In truth it is actually quite fun, pink and a little bit of their fun has even crept into my wardrobe.  So these days when I make them some clothing, I use the scraps to make a matching headband.  I thought I would share how I make these super easy headbands.


What You Need:

Two largish fabric scraps, 3/4" elastic scrap, thread (doesn't need to match).


I made this headband for my 3 year old, these are the strips I cut:

Elastic : 3/4" x 4 1/2"
Elastic casing: 2.5" x 8 1/2"
Headband main: 5 1/2 " x 15"

I have made these for my 6 year old and I just adjust the Headband main by adding an inch.  For my one year old I remove an inch. 

Sewing the Headband:

1. Cut the fabric strips and elastic
2. Fold the strips longways with right sides together and sew along the long raw edge to make fabric tubes.  Turn right sides out.
Tip: for the elastic casing to make it easier to turn out I catch a piece of ribbon inside the the tube in the first few stitches, so you just pull the ribbon and the tube turns right sides out (no need for chopsticks) as in the photos below:


3. Cut the ribbon off as close to the seam as you can without cutting your fabric.  Then press the tubes flat with the seams in the centre as shown.


4. Thread the elastic through the elastic casing (small tube).  Sew each end together with a straight stitch to hold the elastic in place.
Tip: I find it handy to thread with a safety pin but also use one to hold the end together.


5. Place the headband tube and elastic tube together as pictured.  Right sides together with raw edges matching.  Then wrap the headband around the elastic tube, with raw edges matching.


6. Sew together with 1/4" seam or slightly longer to make sure you have concealed your elastic basting when you turn it right sides out.  Finish the seam.  Repeat steps 4 and 5 for the other end.


7. Turn right sides out and you have finished your headband!


Below was the outfit we happened to be wearing today!  It took a bribe of turning TV on to get her to take the red headband off so we could take photos of  the new pink one!  Thus the very blank looks.....


Again if you do make any of these headbands I would love to see them.  So please post pictures on my facebook page.  This tutorial is just intended to give you the basic guidelines.  Go crazy, use some scrappy piecing, add a pretty fabric flower, make a wider band (like is very popular here in Europe) or narrower like Alannah is wearing below, possibilities are endless.


Happy Sewing!!

Friday, April 13, 2012

The view from my sewing nook

It has been raining here for days and days.  Last night after I put the kids to bed and was settling down at my sewing nook to work on our picnic quilt, the clouds finally parted, a rainbow appeared and the sun shone down on the hill.  I wish my photography was better, it was truely stunning. 


 Oh yes, I know I am super lucky that my sewing table is at the window that looks out at this view!

Thursday, April 12, 2012

Twirly Whirly Reversible Tiered Skirt Tutorial

This spring/summer I plan to buy the kids a few basics (tee's, leggings, sweaters...) and sew skirts, dresses and hats to go with them. It's a plan not an oath, so I will see how we go!  Since it is well and truly spring, time to get sewing.  Alannah has a new party dress, so it was Xanthe's turn for a new piece of clothing.  As we seem to have lots of Tee shirts from Alannah in Xanthe's size I decided to sew her a skirt..........even though I knew she would prefer a dress!

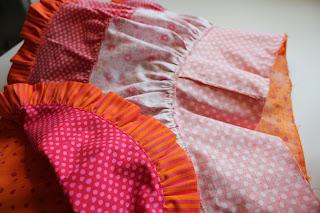
A couple of summers ago I sewed Alannah a simple 3 tiered skirt with a extra frill hem.  She loves it and still wears it but I felt it could be fuller, and that perhaps I should have lined it.  After more thought, instead of lining it I thought it might be more useful and fun to make it reversible, which would give it the volume and extra girly twirlyness plus 2 skirts in one.  So this is Xanthe's new Twirly Whirly Reversible Tierd Skirt:


Twirly Whirly Reversible Tiered Skirt Tutorial

This is a very straight forward skirt to make, but all those long gathered seams are time consuming!  Essentially you will be making two identical (in pattern) skirts and sewing them together so I highly recommend making them both at the same time.  If it gets too confusing, finish one and then repeat the instructions for the second.
I chose to make one side in multi fabric and the reverse side in one fabric but with ribbon trim on the seams.  There are so many ways you can vary this skirt by mixing up the fabrics and trims.  I would like to make a variation with cotton lace as one hemband, perhaps a little longer than the other to give a petticoat feel one way and a country feel the other.

You will need
  • Approx 1 yard of fabric for each skirt (that is what I used for this skirt, approx 4T size, you will need more or less if you make a larger or smaller size!)
  • Coordinating thread
  • 1" wide elastic (length = waist measurement of your child less 1 ")
  • Optional ribbon or trims
Cutting Your Strips

The beauty of this skirt is that nothing needs to be exact. These are roughly the formulas I used to cut my strips for the skirt: 
  • For the width of the strips, you want to make sure each band is progressively larger than the previous to have plenty of gather each tier.  I have kept the waistband relatively narrow so there is not too much bulk from the double layer of fabric.
  • For the length, the skirt is essentially 3 even bands with an extra frill.  So determine the finished length you require and divide by 3.  I have used a 1/4" seam allowance to sew this skirt so add 1/2" to each of the first three bands for the seam allowance.  The hemband is 3" including seam allowance.
My daughters waist measurement was 20" and a skirt length of 13" was required.  So I cut the waistband at 27" x 4 1/2".  For the first tier I cut two strips of 27" x 4 1/2".  For the second tier I cut 2 strips at 42" x 4 1/2".  For the hemband I cut 3 strips at 42" x 3". 
Note: She is a small almost 4 year old so I cut this large for her to grow into, I would estimate that my measurements equate to around a 4T (with a smaller than average waist).


I also wanted to use ribbon for trimming one side of the skirt.  I needed the length of my hemband +  length of 1st tier in  ribbon (27" x 3 = 81").

Don't forget to cut out strips for both skirts.


Sewing The Skirt

Note: a 1/4" seam allowance is used for all seams.

1. With fabric right sides together sew the short ends of the waistband together.  With right sides together match the short sides of the remaining 3 layers sewing each tier into a band.  Finish the short edge seams as desired, I used a zig zag stitch.  Press the seams on the tiers to one side.


For the hem band it is not necessary to finish the seams (yes I know I did but I wasn't thinking!).  Instead fold in half around the long edge with right sides out and press. 


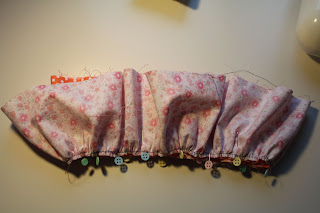
2. You will now have 8 bands (4 if you are sewing one skirt at a time).  Using a long basting stitch baste the the top of the first tier and second tier and the folded raw edge of the hem band, just inside the 1/4" you will use to finish the seam (the waistband gathers with the elastic).  Do not reverse your stitching at the start and finish or cross over your stitching, but run a couple of inches parallel at the start finish point as in the picture.
Tip: For basting I adjust my machine to maximum stitch length and change the thread to a contrasting colour to make it easier to unpick once the seam is sewn (black in this case).


3. Gather the first tier to fit the bottom of the waistband piece.  This is done by gently pulling the bobbin thread and easing the gather evenly around the band.   
Note: Gathering is definitely fiddly at first.  There are other methods you can try this is just the one I use.


4. With right sides together pin and sew together, the bottom of the waistband with the top of the first tier.
Note: Don't forget to change the thread back to your sewing colour and stitch length back to normal.


5. Unpick the basting stitches and neaten up the stray threads.  Make sure to check the right side.


6. Finish off the raw edges.  Iron the seam towards the waistband and top stitch 1/8" from the seam.


Tip: The top stitch is to keep the seams neat, but it can be a feature, use a contrasting thread or fancy stitch to add interest.  Sew ric rac or ribbon around the seam to add a bolder statement.  If you won't catch the seam with the trim then top stitch the seam first to keep the seams tidy (on the inside).  Also I use a slightly longer stitch for top stitching, I think it gives a neater finish.


7. Repeat steps 3 to 6 to attach the second tier to the first tier and the hem ruffle to the second tier.
Tip: To attach the second layer to the third, a good place to start is to match up the seams and gather in two halves rather than the whole skirt at once.


8. You should now have two almost finished skirts.  With one skirt inside the other, right sides together and the waistband raw edges matching sew together with a 1/4" seam.


9. Turn right sides out (wrong sides together) and roll the top edge with your fingers then press.


10. Top stitch 1/8" from the edge.
Tip: You can you a different coloured thread in your bobbin to your machine thread so each side is top stitched in matching threads.  I used a cream thread for the top stitching on my multi fabric side and a pink thread in my bobbin for my all orange side.


11. Sew another row of stitching 1 1/4" from the edge to form a casing for the elastic.  Leave 2 inch gap to feed the elastic.  To get the right fit I measure my child's waist remove one inch from the measurement and sew the elastic ends together (many times) with a zig zag stitch using a 1/2" overlap.


12. Sew closed the gap you left for feeding the elastic and you have one twirly whirly reversible tiered skirt.


If you use this tutorial or are even just inspired by this tutorial to make a skirt I would love to see it.  Please post photos or links on my facebook page or send me an email.

Margaret x