Thursday, June 20, 2013

School Dress For Alannah

When we moved to Switzerland Alannah was bitterly disappointed to discover that they don't wear school uniforms here.  As an almost 5 year old about to start school in Australia, getting her first uniform and feeling like a big school kid was a really exciting thing.  But we left just before this happened.  So I promised I would make her a school uniform like dress.  After a bit of searching I  had my heart set on a the Oliver + S, Jump Rope Dress but at the time it was out of print and I could not find a copy.

Last year the Jump Rope Dress pattern was digitally released and I bought my first ever digital pattern.  Which I like for the convenience of getting the pattern so quickly but I still prefer a printed pattern, probably because our printer is not the greatest, plus with such a detailed dress it took quite some time to put all the pages together. 

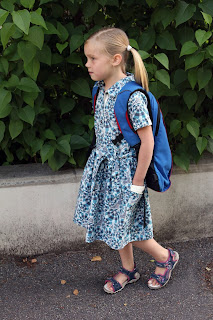
I chose Anna Maria Horner's, Buoyancy in Deep for the fabric.  Love this fabric, it has the right school dress colouring but is so much prettier. 


Finally 3 weeks ago (after spending months procrastinating over weather to sew a white collar or use the dress fabric) with the school year end rapidly approaching, I started sewing.  As with all the Oliver + S patterns I have sewn to date I found this dress came together perfectly.  It has lots of details like a placket, collar, sleeves with cuffs, pockets and a belt with belt loops, so it took some time to construct, but it was well worth the effort.


I sewed up size 7 and made no alterations to the fit.  The dress fits Alannah (who is a smallish to average size 7 year old) great with room to grow so hopefully will fit after the summer holidays as well, especially as we only have one and a half weeks of school left till Summer Holidays.


Alannah loves her "school uniform" dress and so do I.  I think it has the feel of a school uniform but is so much lovelier.


Sunday, June 9, 2013

Schweizer Frauenlauf 2013

Scott and I have really been enjoying running lately.  We have been entering a few races and I am hoping to find the time to run a little more and get fit enough to enter my first half marathon later this year.  Today though was just for us girls, participating in the Swiss Woman's Run in Bern.  


I ran the 5km race and Alannah and Xanthe ran the 500m race.  Philippa is still to little but she enjoyed cheering us on with Daddy.  


This was the girls first run ever, not just race but first time going for a run.  They both enjoyed the run and look forward to their next. 

Alannah at the start line
Alannah arm in arm with another girl from the race, yep she managed to make a friend in a 3minuite 500m race!
Xanthe nearing the finishing line.
The atmosphere was great, with well over 10,000 women of all ages running and walking in various distance events. We don't plan on the girls becoming serious runners but we really enjoy the fun and excitement of being involved in such a big social sporting event and it was nice to share that with our girls.


Saturday, June 8, 2013

Another mesanger bag

I love giving the girls something handmade by me as a present.  So after constantly stealing her sisters messenger bags, I made Philippa her own Oliver + S messenger bag for her birthday.  She loves it, this bag goes with us everywhere.


Again like with Alannah's bag I used essentially homemade binding to attach a buckle to the bag.  Philippa loves having the buckle even though she is only able to close and not open it!


The fabric I used is super cute a upholstery weight fabric from a local store Creasphere.  The only catch is that it is a directional print which means if I cut the back/front flap in one piece either the front flap or the back would be upside down.  So I sewed a front flap and back together with a seam on the top fold.  To cover the seam and because I happened to have some super cute owl ribbon in  coordinating colours I decided to sew a strip of it across the seam.  The fabric was all fussy cut giving regard to the owl design of the fabric.

The lining was a combination of an aqua owl print called "on a Whim" by Amy Schimler and "Dot to Dot" in Coral from the Children at play line of fabric by Sarah Jane, both from my stash.  I also used the "Dot to Dot" for the buckle binding.  The rest of the bag binding is a Michael Miller "Ta Dot" in Breeze also from the stash.  Infact the whole bag was made from materials in my stash, some bits like the buckles and webbing used for the strap were stashed with thoughts of making more of these adorable bags.  As was the owl outer fabric, sorry Soul that was intended for your bag, promise yours will be just as awesome.


Oh and in case you were wondering the dress Philippa is wearing is a Felix dress that I made for Xanthe's 3rd birthday (pre Blog).  Using an out of print Sandi Henderson line of fabric.

Thursday, June 6, 2013

Making a Number 3 Piñata

For Alannah's 5th birthday I had about 6 attempts at making a pinata with the paper mache method but had no success, lots of fun but no usable pinata.  So I thought I would try the cardboard method this time.  Which was sooooo much easier and more successful with the added bonus of no messy gloopy glue and temperature sensitive popping balloons.  I must admit the kids were a little disappointed about the lack of gloopy glue...........I found this great number 1 pinata on Chelsea's, The Sweetest Occasion blog.  Using this as inspiration I embarked on making a 3 pinata.

Here is what you need:
  • About 4hrs (less without kid help)
  • A3 sheet of paper (if you wish to make template first), single thickness strongish cardboard (I used a packing box) and cardboard cereal box.
  • masking tape
  • glue stick
  • scissors that can cut cardboard and/or a craft knife
  • crepe paper, I used 5 colours as that is what I had on hand.

I started by making a template of the 3 shape on an A3 piece of paper.  As you can see the girls enjoyed decorating this once I had finished using it.

 
I then traced this onto the sides of our packing box card and cut out 2 identical 3's to form the front and back of the pinata.  Yes we moved 2 years ago, but due to having a huge basement we still have all of our packing boxes.  Which now I have discovered how much fun cardboard crafting can be will be very handy!

I used the larger panels from a cereal packed cut in half for the sides.  Taped them carefully at right angles to the front with small pieces of masking tape.  I left a hole at the top for filling with treats later.  I also reinforced the around the opening using 2 layers of cereal box card and lots of tape.  Then put 2 holes in each side and attached double thickness string to allow for hanging.


To prepare the paper fringe, cut about 2 inches from the roll of crepe paper.  Then keeping it folded cut half way up at approx 1/4 inch intervals.


I used 5 colours of crepe paper so roughly I measured 5 even sections on the pinata marked them with a pencil and started papering from the bottom up.  Due to the overlapping fringe I should have made the bottom layer an inch wider and the top an inch skinner.

To cover the 3, I started by gluing a flat layer of the green paper over the bottom curve of the 3.   Then working on the front side about an inch from the bottom of the 3 I started working around with the fringed paper.  I used a glue stick to stick down the uncut edges.  The unusual shape of the 3 did make it a little complicated to cover, but just keep working your way up from the bottom covering all the card. 


I filled the pinata with treats just before the party and covered the hole with crepe paper so it looked finished.  All in all it took me about 4hrs to make, and cost less than 4 CHF to make.


We have another birthday to celebrate in a couple of weeks so will be giving a 5 a go soon....